Lab 1.3 Enable IP v6, Disable IP v6, Upgrade Version, Downgrade Version, and Net Install
Assalammualaikum, wr,wb.Kali ini saya akan memposting tentang cara Mematikan dan Menyalakan IP v6, Meningkatkan dan menurunkan Versi, dan Net Instal pada RouterBoard Mikrotik.
This is time I will post about how Turn on and Turn Off for IP v6, Upgrade and Downgrade versions, and Net Install on MikroTik RouterBoard.
A. Tujuan
A. Purpose
- Anda dapat mengetahui dan memahami cara menyalakan dan mematikan IP v6, Meningkatkan dan menurunkan versi, dan Net Instal pada RouterBoard Mikrotik
You can know and understand how to turn on and turn off IP v6, Upgrade abd Downgrade version, and Net Install on MikroTik RouterBoard
B. Bahan-Bahan
B. Materials
- RouterBoard MikroTik R951G-2Hnd
- RouterBoard MikroTik RG951G-2Hnd
- 1 PC/Laptop
- 1 PC/Laptop
- Kabel UTP
- UTP cable
- Kabel Power RouterBoard
- Power Cable RouterBoard
- WinBox (Software)
- WinBox
- NetInstall (Software)
- NetInstall
C. Langkah Kerja
c. Steps
1. Hubungkan Kabel Power RouterBoard dan juga dengan Kabel UTP dari RouterBoard ke PC menggunakan Port 2
1. Connect the Power Cord RouterBoard and also with UTP cable from the PC to the RouterBoard using Port 2
2. Buka WinBox,Klik "...", Klik MAC Address.
2. Open WinBox, Click "...", Select MAC Address.

3. Login dengan menggunakan Admin dan Password "kosong" kemudian klik Connect.
3. Login using the Admin and Password "empty" and then click Connect

4. Mengecheck versi, Nama RouterBoard, dan Spesifikasi RouterBoard dengan mengklik System kemudian Resources
4. Check version, Name RouterBoard, and Specifications RouterBoard by clicking System and then click Resources.

5. Akan tampil seperti gambar di bawah ini
5. Will appear as shown below

6. Mengecek Liseni di lihat pada System lalu klik License
6. Checking License seen in the System and then click License

7. Dapat dilihat pada "Expires In" tidak terdapat apa apa berarti tidak ada batas pemakaiannya.
7. Can be seen in the "Expires In" there anything means no limit its use.

8. Reset konfigurasi dan merestart RouterBoard menggunakan Default agar IP Address muncul
8. Reset configuration and restart RouterBoard using that IP address appears Default

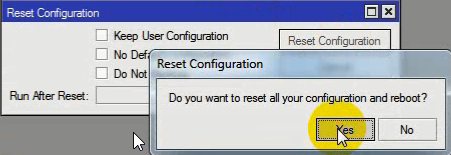
9. Reset Konfigurasi hingga 2 kali sampai RouterBoard mereboot
9. Reset Configuration to 2 times until RouterBoard reboots

10. Buka WinBox, Masuk dengan IP Address. Klik "..." Pilih IP Address, Login dengan Admin dan Password "kosong" kemudian klik connect
10. open WinBox, Login with IP Address. Click the "..." Select IP Address, Login with Admin and Password "empty" then click connect

Disable IP v6
1. Untuk melumpuhkan IP v6, klik Sysytem kemudian pilih Package
1. To Disable IPv6, click System and then select Package

2. Kemudian klik pada IPv6 pilih Disable untuk mematikan IPv6
2. Then click on IPv6 select Disable to disable IPv6

3. Untuk me reboot pilih System kemudian Reboot, klik yes untuk mereboot
3. To reboot then select System and then Reboot, click yes to reboot


4. Kemudian masuk ke WinBox kembali untuk melihat Package List bisa mengikuti cara no 1 di atas. Terlihat IPv6 sudah mati
4. Then go to WinBox back to see Package List can follow No. 1 in the above manner. Looks IPv6 is dead

Upgrade Version
1. Buka WinBox, Masuk menggunakan IP Address. Klik pada "..." Login dengan menggunakan user yang ada milik, saya menggunakan user admin,jika sudah klik connect. Pada kotak kuning terdapat versi dari routerboardnya.
1. Open WinBox, Log in using IP Address. Click on the "..." Login using an existing user belongs to, I use the admin user and then click Connect. In the yellow box there is a version of RouterBoard.

2. Copy kan Version 6.5.npk download dari http://www.mikrotik.com atau http://routeros.co.id, jika sudah tercopy buka File pada WinBox.
2. Version 6.5.npk copied or downloaded from http://www.mikrotik.com http://routeros.co.id, if it is copied go to File on WinBox.


3. Jika sudah tercopy, paste dengan mengklik pada mouse pointer dengan bulatan kuning. kemudian proses upload
3. If it has been copied, paste by clicking on the mouse pointer with yellow dots. and then Process upload

4. Mereboot dengan klik System kemudian Reboot, hingga muncul pop up Router has been disconnected.
4. reboot the system and then click Reboot, until a pop-up Router has been disconnected.


5. Masuk ke WinBox kembali, pilih "..." klik pada bagian IP Address kemudian connect. pada kotak berwarna biru Versionnya sudah baru.
5. Sign in to WinBox back, select "..." Click on the IP Address and then connect. the blue box has a new Version.

6. Untuk melihat lebih jelas, klik pada System pilih Resources. Versionnya sudah 6.25
6. To see more details, click on the System select Resources. Version already 6,25


Downgrade Version
1. Buka WinBox, Masuk menggunakan IP Address. Klik pada "..." Login dengan menggunakan user yang ada milik, saya menggunakan user admin,jika sudah klik connect. Pada kotak biru terdapat versi dari routerboardnya.
1. Open WinBox, Log in using IP Address. Click on the "..." Login using an existing user belongs to, I use the admin user and then click Connect. In the blue box there is a version of routerboard.
2. Copy kan Version 5.26.npk download dari http://www.mikrotik.com atau http://routeros.co.id, jika sudah tercopy buka File pada WinBox.
2. Version 2.26.npk copied or downloaded from http://www.mikrotik.com http://routeros.co.id, if it is copied go to File on WinBox.

3. Jika sudah tercopy, paste dengan mengklik pada mouse pointer dengan bulatan kuning. kemudian proses upload
3. If it has been copied, paste by clicking on the mouse pointer with yellow dots. and then Process upload

4. Untuk meDowngrade ke System kemudian Package. Klik pada router-mipsbe paling atas kemudian klik downgrade jika ada pop-up klik yes. Setelah itu Router akan ter disconnected
4. To Downgrade to System then Package. Click on the router-mipsbe top then click downgrade if no pop-up click yes. After the Router will pitch disconnected


5. Masuk ke WinBox kembali, pilih "..." klik pada bagian IP Address kemudian connect. pada kotak berwarna biru Versionnya sudah baru.
5. Sign in to WinBox back, select "..." Click on the IP Address and then connect. the blue box has a new Version.

6. Untuk melihat lebih jelas, klik pada System pilih Resources. Versionnya sudah 5.26
6. To see more details, click on the System select Resources. Version already 5,26

Net Install
1. Setting Pada RouterBoard, Klik System kemudian RouterBoard
1. Setting On RouterBoard, click System and then RouterBoard

2. Klik Setting
2. Click Settings

3. Pada Boot Device ubah menjadi try-ethernet-once-then-mand, Klik Apply kemudian OK
3. On the Boot Device turned into a try-ethernet-once-then-mand, click Apply and then OK

4. Versi yang saya jalan adalah 5.26 maka dari itu Instal Ulang menjadi versi terbaru yaitu 6,24 buat folder dengan berisikan router-mipsbe-6,24.npk
4. My version is 5.26 then the path of the Reinstall become the latest version 6.24 for the folder containing the router-mipsbe-6,24.npk

5. Buka Aplikasi Net Install dengan di Run Administrator
5. Open Application at Run NetInstall by Administrator

6. Pilih Browse.. kemudian pilih Folder (Router 6,24) yang kita sudah buat
6. Select Browse .. then choose Folder (Router 6.24) that we've created


7. Pilih Net Booting, masukkan IP Client dan jangan lupa untuk menceklis Boot Server Enable.
7. Select Net Booting, enter the IP Client and do not forget to checklist the Enable Boot Server.


8. Akan muncul RouterBoard yang kita gunakan klik kemudian ceklis pada router-mipsbe 6.25, lalu install
8. RouterBoard would appear that we use and then click on the tick-mipsbe 6:25 router, and then install

9. Jika terdapat tulisan OK maka intalasi berhasil
9. If it says OK, the installation was successful

10. Klik pada "...." kemudian pilih Mac Address, untuk user menggunakan Admin dengan password "kosong" kemudian Connect
10. Click on "...." then select Mac Address, to use the Admin user with the password "empty" then Connect


11. Klik System, kemudian Resources lihat versi sudah menjadi 6,25
11. Click System, then the Resources view version has to 6.25


Selesai~
Semoga Bisa Membantu~
Hope Can Help~
Wassalammualaikum wr,wb.


0 komentar:
Posting Komentar